


Summarize this blog post with:
Most site owners assume Google will just find their website. Sometimes it does. But waiting around is a bad strategy when you could submit your site in under two minutes and start the indexing process right away.
And here’s something most guides won’t tell you: getting indexed by Google is only half the game now. AI search engines are pulling from Google’s index, from Bing’s index, and from their own crawling infrastructure. If your website isn’t properly submitted and indexed, you’re invisible in both traditional search and the growing world of AI-generated answers.
In this article, you’ll learn how to submit your website to Google step by step, why it matters for getting indexed, how long it takes, how to troubleshoot pages that won’t index, and how to make sure your site also shows up in AI search engines like ChatGPT, Perplexity, and Gemini.
Table of Contents
How Google Discovers and Indexes Your Website
Before you submit anything, it helps to understand what happens behind the scenes. Google finds and indexes content in four steps.
Step 1: Discovery. Google learns your website exists. It finds most sites through sitemaps or backlinks from pages it already knows about.
Step 2: Crawling. A program called Googlebot visits your pages and downloads them. Think of it as Google’s robot reading every page on your site.
Step 3: Processing. Google extracts key information from the crawled pages, including the text, images, links, and structured data.
Step 4: Indexing. The processed information gets added to Google’s search index. This is the massive database that Google pulls search results from. If your page isn’t in the index, it won’t show up for any search query. Ever.
Each step happens in order. Submitting your website speeds up Step 1 (Discovery), which means you reach Step 4 (Indexing) faster.
Here’s how the process works visually:
|
Step |
What Happens |
What Can Go Wrong |
|---|---|---|
|
Discovery |
Google learns your URL exists |
No sitemap submitted, no backlinks pointing to your site |
|
Crawling |
Googlebot downloads your pages |
Blocked by robots.txt, server errors, slow load times |
|
Processing |
Google extracts content and signals |
Duplicate content, thin pages, rendering issues |
|
Indexing |
Page is added to Google’s search database |
Noindex tags, low-quality content, crawl budget limits |
Understanding this pipeline matters because most indexing problems happen at one of these four stages. When you troubleshoot later, you’ll know exactly where to look.
How to Submit Your Website to Google
There are two ways to submit your website to Google. Both are free and take less than a minute once you have your sitemap URL ready.
First, Find Your Sitemap
Both submission methods require your sitemap URL. A sitemap is an XML file that lists all the important pages on your website. It tells Google which pages exist, when they were last updated, and how important they are relative to each other.
Where you find your sitemap depends on your platform:
WordPress: Install a free SEO plugin like Yoast, Rank Math, or The SEO Framework. All three generate sitemaps automatically. Your sitemap will be at yourwebsite.com/sitemap_index.xml.
![[Screenshot: WordPress dashboard showing Yoast SEO sitemap settings page with the sitemap URL highlighted]](https://www.datocms-assets.com/164164/1776706154-blobid1.png?auto=format,compress&w=1248&fit=max)
Shopify: Your sitemap is auto-generated at yourwebsite.com/sitemap.xml. No plugins needed.
Wix: Same as Shopify. Find it at yourwebsite.com/sitemap.xml.
Squarespace: Your sitemap is at yourwebsite.com/sitemap.xml. Squarespace generates it automatically for all pages, blog posts, and products.
Custom-built sites: Check the most common locations first:
-
yourwebsite.com/sitemap.xml
-
yourwebsite.com/sitemap_index.xml
-
yourwebsite.com/sitemap1.xml
If your sitemap isn’t at any of those URLs, check your robots.txt file at yourwebsite.com/robots.txt. Most websites list their sitemap location there.
![[Screenshot: A robots.txt file in a browser showing the Sitemap directive with the URL highlighted]](https://www.datocms-assets.com/164164/1776706163-blobid2.png?auto=format,compress&w=1248&fit=max)
If you don’t have a sitemap at all, you’ll need to create one before continuing. Tools like XML-Sitemaps.com can generate one for small sites (under 500 pages). For larger sites, use a plugin or a server-side generator specific to your tech stack.
Option 1: Submit Your Sitemap Through Google Search Console (Recommended)
This is the best method. Google Search Console doesn’t just accept your sitemap. It also monitors it over time and alerts you when something breaks.
Here’s how to do it:
-
Go to Google Search Console and sign in with your Google account.
-
If you haven’t already, add your website as a property. Choose “URL prefix” for simplicity. You’ll need to verify you own the site by adding a meta tag, uploading an HTML file, or verifying through your DNS provider.
-
Once verified, click “Sitemaps” in the left sidebar.
-
In the “Add a new sitemap” field, paste your sitemap URL (for example, https://yourwebsite.com/sitemap.xml).
-
Click “Submit.”
![[Screenshot: Google Search Console Sitemaps page showing the sitemap URL input field and the Submit button]](https://www.datocms-assets.com/164164/1776706163-blobid3.png?auto=format,compress&w=1248&fit=max)
You should see a “Success” status next to your sitemap. Google will now check this sitemap regularly for new and updated pages.
Why this method is better: Google Search Console gives you ongoing visibility into your site’s health. You’ll see which pages are indexed, which ones are excluded, and why. That kind of diagnostic data is invaluable when you’re trying to troubleshoot indexing issues later.
Option 2: Submit Your Sitemap by Pinging Google
Google runs a “ping” service that lets you notify it about new or updated sitemaps. You don’t need to sign into anything. Just type a URL into your browser.
Replace the placeholder with your actual sitemap URL:
https://www.google.com/ping?sitemap=https://yourwebsite.com/sitemap.xml
Hit Enter. If it works, you’ll see a “Sitemap notification received” confirmation page.
![[Screenshot: Browser showing Google’s “Sitemap notification received” confirmation page]](https://www.datocms-assets.com/164164/1776706168-blobid4.png?auto=format,compress&w=1248&fit=max)
This method is fast, but it’s a one-shot deal. There’s no dashboard, no error reporting, no follow-up. You won’t know if Google ran into problems crawling your sitemap unless you also use Search Console.
When to use the ping method: Use it as a supplement, not a replacement. If you’ve just published a batch of new pages and want to nudge Google to re-check your sitemap sooner, ping it. But always have Search Console set up as your primary monitoring tool.
Google recommends using the ping service only for new or updated sitemaps. Don’t repeatedly ping the same unchanged sitemap.
How to Submit Individual URLs to Google
Most of the time, you don’t need to submit individual pages. If a page is in your sitemap and you’ve already submitted that sitemap to Google, the page will get discovered and crawled eventually.
But sometimes “eventually” isn’t fast enough. Maybe you’ve just published a time-sensitive article. Maybe you’ve made major updates to a key landing page and want Google to re-index it quickly.
Here are two ways to speed things up.
Option 1: Ping Google After Adding Pages to Your Sitemap
Make sure the new pages are included in your sitemap, then ping Google using the URL from the previous section. This tells Google to re-check the sitemap and discover the new URLs.
If you use WordPress with Yoast, Rank Math, or The SEO Framework, this happens automatically. These plugins ping Google every time your sitemap updates. You don’t need to do anything.
Option 2: Use the URL Inspection Tool in Google Search Console
The URL Inspection Tool lets you submit a specific page directly to Google, even if it’s not in your sitemap (though it should be).
Here’s how:
-
Log into Google Search Console.
-
Make sure you’re viewing the correct property.
-
Click “URL Inspection” in the left sidebar.
-
Paste the full URL of the page you want indexed.
-
Press Enter.
-
If the page isn’t indexed yet, you’ll see a “URL is not on Google” message. Click “Request Indexing.”
![[Screenshot: Google Search Console URL Inspection tool showing “URL is not on Google” status with the “Request Indexing” button highlighted]](https://www.datocms-assets.com/164164/1776706172-blobid5.png?auto=format,compress&w=1248&fit=max)
If the page is already indexed, you’ll see “URL is on Google.” In that case, you don’t need to do anything unless you’ve recently updated the content and want Google to re-crawl it faster. If so, click “Request Indexing” anyway. It may speed up the re-crawl.
A word of caution: Don’t use this tool to submit hundreds of pages one by one. It’s meant for individual URLs. If you have a large batch of new pages, submit your sitemap instead and let Google discover them naturally.
Don’t Forget Bing: It Powers More Than You Think
Most guides about website submission stop at Google. That’s a mistake.
Bing powers a surprising amount of search and AI infrastructure. Microsoft Copilot runs on Bing’s index. Yahoo’s search results come from Bing. DuckDuckGo relies heavily on Bing’s index. And several AI search tools pull from Bing alongside their own crawling.
Submitting your website to Bing is just as easy as submitting to Google.
How to Submit Your Site to Bing
-
Go to Bing Webmaster Tools and sign in.
-
Add your website. You can import your site directly from Google Search Console if you’ve already set that up, which saves time.
-
Once verified, click “Sitemaps” in the left sidebar.
-
Paste your sitemap URL and click “Submit.”
![[Screenshot: Bing Webmaster Tools Sitemaps page with the sitemap submission field and Submit button]](https://www.datocms-assets.com/164164/1776706173-blobid6.jpg?auto=format,compress&w=1248&fit=max)
That’s it. Bing will start crawling your sitemap and indexing your pages. And because Bing’s index feeds into multiple AI search products, this one submission expands your reach significantly.
You can also use Analyze AI’s free Bing Keyword Tool to research keywords specifically for Bing’s ecosystem, which increasingly overlaps with AI search.
Do You Actually Need to Submit Your Website?
Short answer: yes, and here’s why.
Google will eventually find most websites on its own. If another site links to yours, Google will discover that link during its regular crawling and follow it to your pages. Over time, your site gets indexed without you lifting a finger.
But “eventually” and “over time” are the key phrases. Submitting your website doesn’t just speed up discovery. It comes with three other benefits that matter more than most people realize.
1. It Tells Google Which Pages Matter
Your sitemap doesn’t have to include every page on your site. In fact, it shouldn’t. A well-built sitemap lists only the important pages and leaves out things like login pages, admin panels, and duplicate content. This helps Google understand what you want indexed and what you don’t.
Without a sitemap, Google makes its own decisions about what’s important. Those decisions don’t always match yours.
2. It Helps Google Find Orphan Pages
Orphan pages are pages with no internal links pointing to them. Google can only discover pages by following links, so if a page has no internal links and no backlinks from other sites, Google will never find it through crawling alone.
Your sitemap solves this. Even if a page is completely unlinked, the sitemap tells Google it exists. This is especially important for large ecommerce sites with thousands of product pages that might accidentally end up orphaned.
3. It Notifies Google About Updates
When you update existing content, your sitemap’s lastmod timestamps change. This signals to Google that certain pages have new content worth re-crawling. Without a sitemap, Google might not revisit an old page for weeks or months, even if you’ve made substantial improvements.
This is especially important if you’re running a content refresh strategy. You want Google to re-crawl updated pages quickly so the improved versions start ranking sooner.
How Long Does It Take for Google to Index Your Website?
Google says that crawling can take anywhere from a few days to a few weeks. In practice, here’s what most site owners experience:
|
Scenario |
Typical Indexing Time |
|---|---|
|
New page on an established site with a submitted sitemap |
1 to 3 days |
|
New page on a brand-new site |
4 to 14 days |
|
Updated page after requesting re-indexing |
1 to 7 days |
|
Page on a new site with no sitemap and no backlinks |
2 to 6 weeks (sometimes longer) |
Several factors influence indexing speed:
-
Site authority. Established sites with lots of quality backlinks get crawled more frequently. Google allocates more “crawl budget” to authoritative domains.
-
Content freshness signals. If your site publishes new content regularly, Googlebot visits more often.
-
Server performance. Slow servers and frequent downtime discourage frequent crawling.
-
Page quality. Google deprioritizes thin or duplicate content, sometimes skipping indexing entirely.
If your site is brand new and has no backlinks, don’t panic if indexing takes a few weeks. That’s normal. Focus on building a few quality links from relevant sites and keep submitting high-quality content.
Why Google Might Not Be Indexing Your Pages
You’ve submitted your sitemap. You’ve requested indexing through the URL Inspection Tool. But some pages still won’t show up in Google. Here are the most common reasons and how to fix them.
1. You’ve Blocked Crawling with robots.txt
Your robots.txt file tells search engines which parts of your site they can and can’t access. If you’ve accidentally blocked Googlebot from crawling certain pages (or your entire site), those pages won’t get indexed.
Here’s what a blocking robots.txt rule looks like:
User-agent: Googlebot
Disallow: /
That single / after Disallow blocks Googlebot from crawling every page on your site. It’s more common than you’d think, especially on sites that were recently in development and forgot to remove the block before going live.
How to check: Visit yourwebsite.com/robots.txt in your browser and look for Disallow directives. If you see broad rules blocking important sections, update the file.
You can also check in Google Search Console. Go to the Pages report (previously called Coverage), toggle the “Not indexed” filter, and look for issues labeled:
-
“Blocked by robots.txt”
-
“Submitted URL blocked by robots.txt”
![[Screenshot: Google Search Console Pages report showing “Not indexed” filter with robots.txt blocking issues highlighted]](https://www.datocms-assets.com/164164/1776706178-blobid7.jpg?auto=format,compress&w=1248&fit=max)
How to fix it: Edit your robots.txt file to remove any rules that block Googlebot from crawling pages you want indexed. If you’re unsure which pages are affected, use Analyze AI’s free Broken Link Checker to audit your site’s accessibility, then cross-reference with your robots.txt rules.
2. You Have “noindex” Tags on Important Pages
A noindex meta tag tells Google explicitly not to index a page, even if it can crawl it. The tag looks like this in your page’s HTML:
<meta name="robots" content="noindex">
Or it can be sent as an HTTP header:
X-Robots-Tag: noindex
Either way, Google will obey the directive and exclude the page from its index.
How to check: In Google Search Console, go to the Pages report and look for:
-
“Submitted URL marked ‘noindex’”
-
“Excluded by ‘noindex’ tag”
![[Screenshot: Google Search Console Pages report showing noindex-related exclusion reasons]](https://www.datocms-assets.com/164164/1776706179-blobid8.png?auto=format,compress&w=1248&fit=max)
How to fix it: Remove the noindex tag from any page you want indexed. Common culprits include:
-
SEO plugins set to “noindex” by default for certain page types (like tag pages or author archives in WordPress)
-
Development-stage settings that were never reverted
-
CMS templates that apply noindex to entire sections of the site
After removing the tag, use the URL Inspection Tool to request re-indexing. Google should pick up the change within a few days.
3. Your Pages Are Low Quality or Thin
Google doesn’t index everything it discovers. If a page doesn’t offer enough value to searchers, Google may choose to skip it entirely.
In 2018, Google’s John Mueller noted that it’s normal for Google not to index every URL it knows about. The bar for indexing has only gotten higher since then, especially as Google focuses on helpful content over volume.
Signs that your pages might be considered low quality:
-
Very low word counts. A page with just a title and a sentence or two usually won’t make the cut.
-
Duplicate or near-duplicate content. If multiple pages on your site have essentially the same content, Google will typically index only one version and skip the rest.
-
Auto-generated or template-heavy pages. Category pages with no products, location pages with only a city name swapped out, or hub pages with no actual content are common offenders.
How to fix it: Audit your site for thin and duplicate content. Analyze AI’s free Website Traffic Checker can help you identify pages that aren’t pulling their weight. For pages that are genuinely useful but still aren’t indexed, try adding more depth: more detail, more examples, original insights, helpful media.
For pages that truly aren’t valuable, consider consolidating them (redirecting duplicates to a single canonical version) or removing them entirely with a 410 status code.
4. Canonical Tags Are Pointing Elsewhere
A rel="canonical" tag tells Google which version of a page is the “official” one. If Page A has a canonical tag pointing to Page B, Google will index Page B and ignore Page A.
This is intentional when you have duplicate content across multiple URLs (like a product available under multiple categories). But it becomes a problem when canonical tags are misconfigured, such as:
-
Every page canonicalizing to the homepage
-
HTTP versions canonicalizing to HTTPS versions (or vice versa) when only one version exists
-
Paginated pages all canonicalizing to page 1
How to check: View the source code of any page that isn’t indexing and look for <link rel="canonical" href="..."> in the <head>. If the canonical URL points somewhere unexpected, that’s your problem.
How to fix it: Correct the canonical tags so each page either points to itself (self-referencing canonical) or to the correct canonical version.
5. Your Site Has Crawl Errors
Server errors (5xx status codes), redirect loops, and timeout issues all prevent Googlebot from accessing your pages. If Google can’t reach a page, it can’t index it.
How to check: In Google Search Console, check the Pages report for “Server error (5xx)” and “Redirect error” issues. You can also look at the Crawl Stats report under Settings to see if Googlebot is encountering any unusual patterns.
How to fix it: Work with your hosting provider or development team to resolve server-side issues. Common fixes include upgrading hosting for better performance, fixing redirect chains, and ensuring your server can handle Googlebot’s crawl rate.
Going Beyond Indexing: Getting Found in AI Search
Getting indexed in Google is table stakes. It puts you in the race. But the race itself has expanded.
AI search engines like ChatGPT, Perplexity, Gemini, Claude, and Microsoft Copilot are now generating answers that pull directly from web content. When someone asks ChatGPT a question about your industry, will your website show up in the sources it cites? When Google’s AI Mode generates an overview, will it reference your content?
These aren’t hypothetical questions. AI search already accounts for a growing share of web traffic, and the brands that show up in AI-generated answers are capturing clicks that used to go exclusively to traditional search results.
The good news: SEO and AI search visibility aren’t opposites. In fact, they reinforce each other. The same foundations that help Google index and rank your content, including clear structure, quality writing, authoritative backlinks, and proper technical setup, also make your content more likely to be cited by AI models.
But there are a few extra steps worth taking.
Make Your Content Accessible to AI Crawlers
Most AI search engines use their own crawlers alongside web indexes from Google and Bing. Make sure your robots.txt file isn’t blocking AI crawlers. Common AI crawler user agents include:
|
AI Crawler |
User Agent |
|---|---|
|
ChatGPT / OpenAI |
OAI-SearchBot, ChatGPT-User, GPTBot |
|
Google AI (Gemini / AI Overviews) |
Google-Extended, Googlebot |
|
Perplexity |
PerplexityBot |
|
Microsoft Copilot / Bing |
Bingbot |
|
Anthropic (Claude) |
ClaudeBot, anthropic-ai |
|
Meta AI |
FacebookBot, meta-externalagent |
Check your robots.txt file and make sure none of these are disallowed. If you’re unsure, here’s a safe default:
User-agent: *
Allow: /
Sitemap: https://yourwebsite.com/sitemap.xml
This allows all crawlers (including AI ones) to access your site and tells them where your sitemap is.
Add an llms.txt File
Some AI models look for an llms.txt file at the root of your domain. This file, similar in concept to robots.txt, provides a machine-readable summary of your site that helps language models understand your content and structure more efficiently.
You can generate one using Analyze AI’s free LLM.txt Generator. Place the file at yourwebsite.com/llms.txt.
This is a small step, but it signals to AI platforms that you’re actively supporting their crawling and indexing, which can help your content surface more reliably in AI-generated answers.
Submit to Bing (It Matters More Now)
As mentioned earlier, Bing’s index powers several AI search products, including Microsoft Copilot. Submitting your sitemap to Bing Webmaster Tools isn’t just about Bing’s traditional search results anymore. It’s a backdoor into AI search visibility for any product built on Bing’s infrastructure.
If you haven’t submitted to Bing yet, scroll back up to the Bing section and do it now.
Track Whether AI Engines Are Actually Finding You
Submitting your site and hoping for the best isn’t a strategy. You need to measure what’s actually happening.
Analyze AI connects to your Google Analytics and shows you exactly how much traffic comes from AI search engines, which pages they’re sending visitors to, and which AI platforms are driving the most sessions.
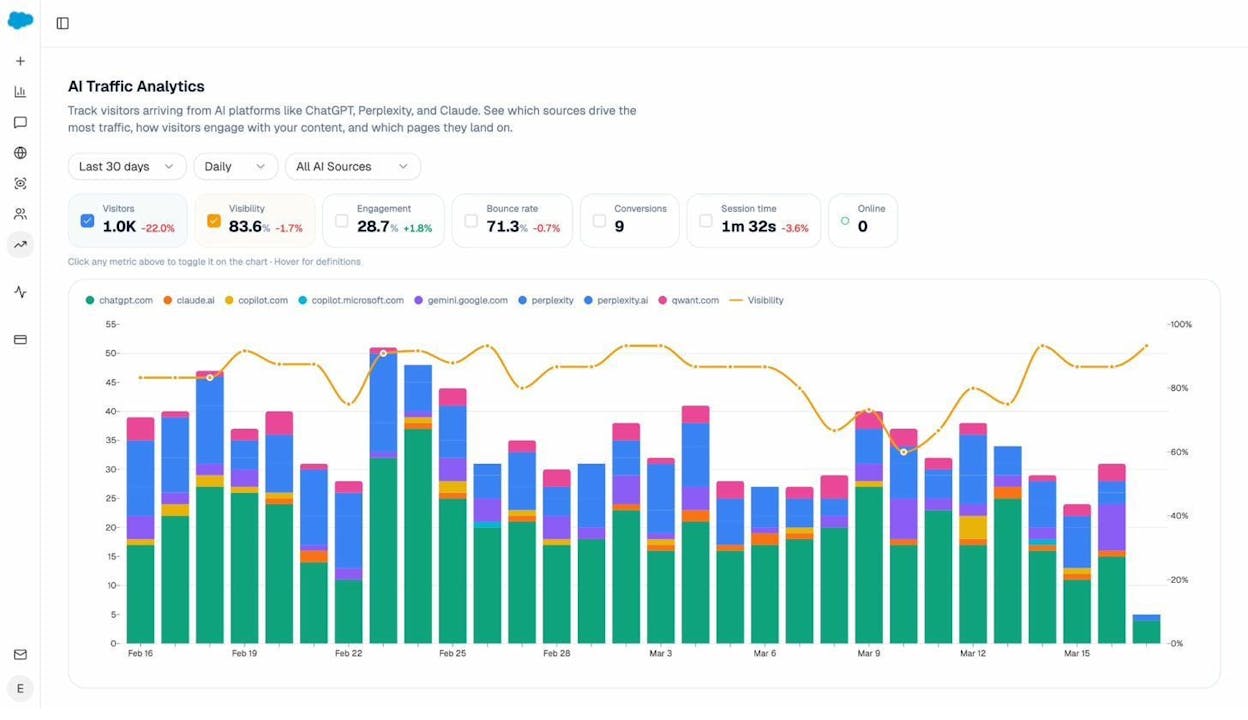
The Landing Pages report takes this further. It shows you which specific pages on your site receive AI-referred traffic, along with engagement metrics like bounce rate, session duration, and conversions. This tells you which content formats and topics AI engines prefer to cite, so you can double down on what works.
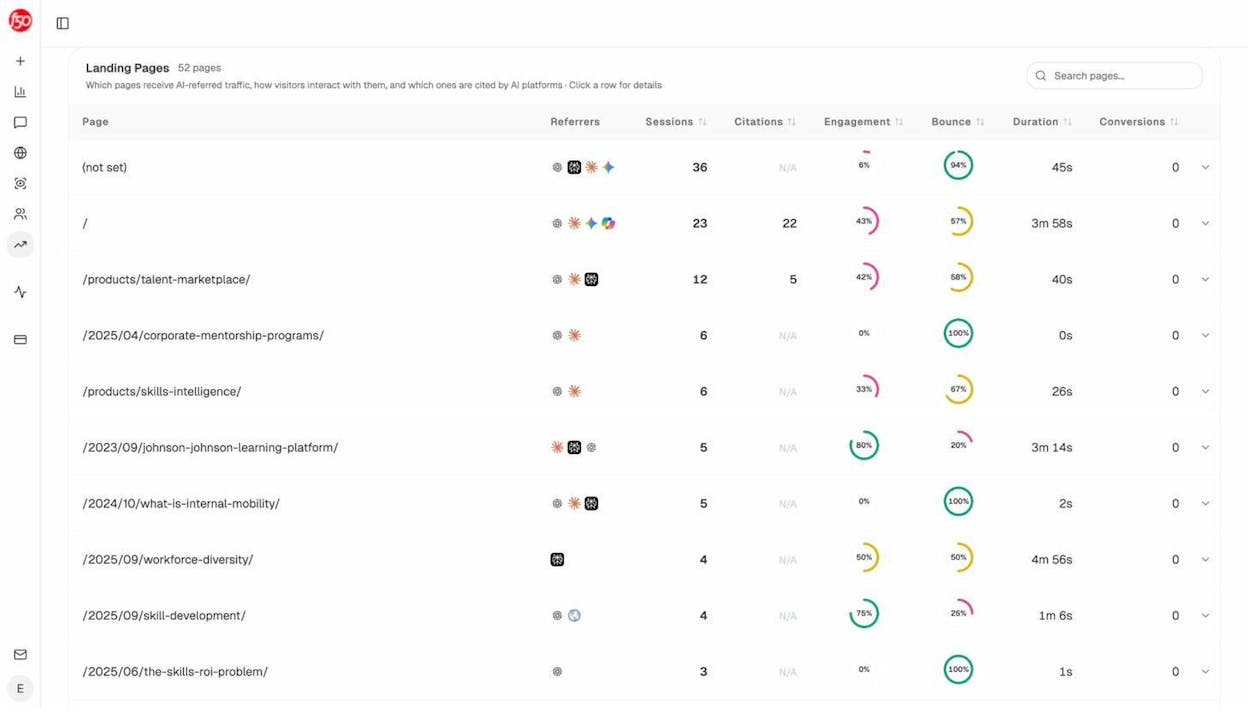
If a page is getting cited by ChatGPT but not by Perplexity, or vice versa, you can see that at a glance. And if your competitors’ content is getting cited where yours isn’t, the Competitors report shows you exactly where you’re losing.
Check Which Sources AI Engines Rely On
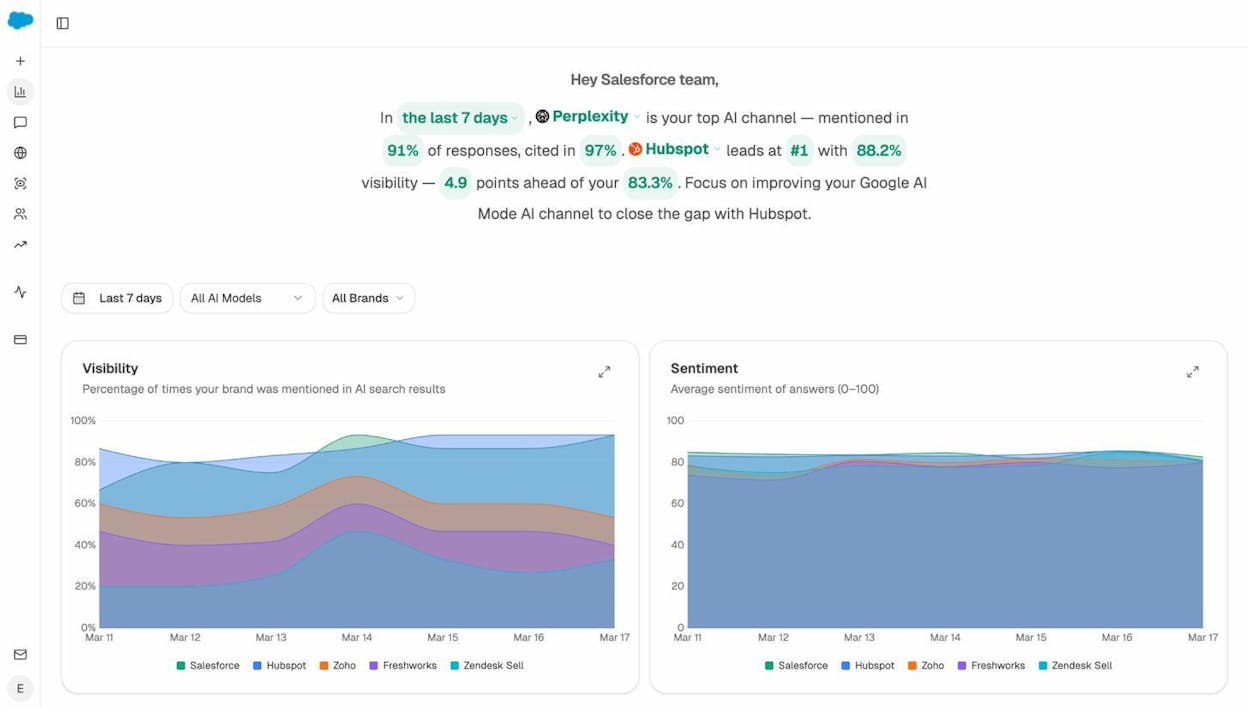
Understanding which websites AI models cite most in your industry is powerful competitive intelligence. If you know that Perplexity heavily cites a particular blog or publication in your space, you can create content that’s better than what’s currently being cited, or earn mentions on those same sources.
Analyze AI’s Sources dashboard shows you the domains that AI engines cite most frequently for your tracked prompts, and what types of content (blog posts, product pages, reviews) get the most citations.

This data helps you answer a question that most website owners never think to ask: “What does my site need to look like to an AI model?”
Monitor the Prompts That Matter
Traditional SEO tracks keywords. AI search tracks prompts. These are the questions and instructions that users type into AI engines, and the answers these engines generate determine whether your brand shows up or not.
With Analyze AI, you can track specific prompts relevant to your business and monitor your visibility, position, and sentiment across models like ChatGPT, Perplexity, Gemini, and Claude.
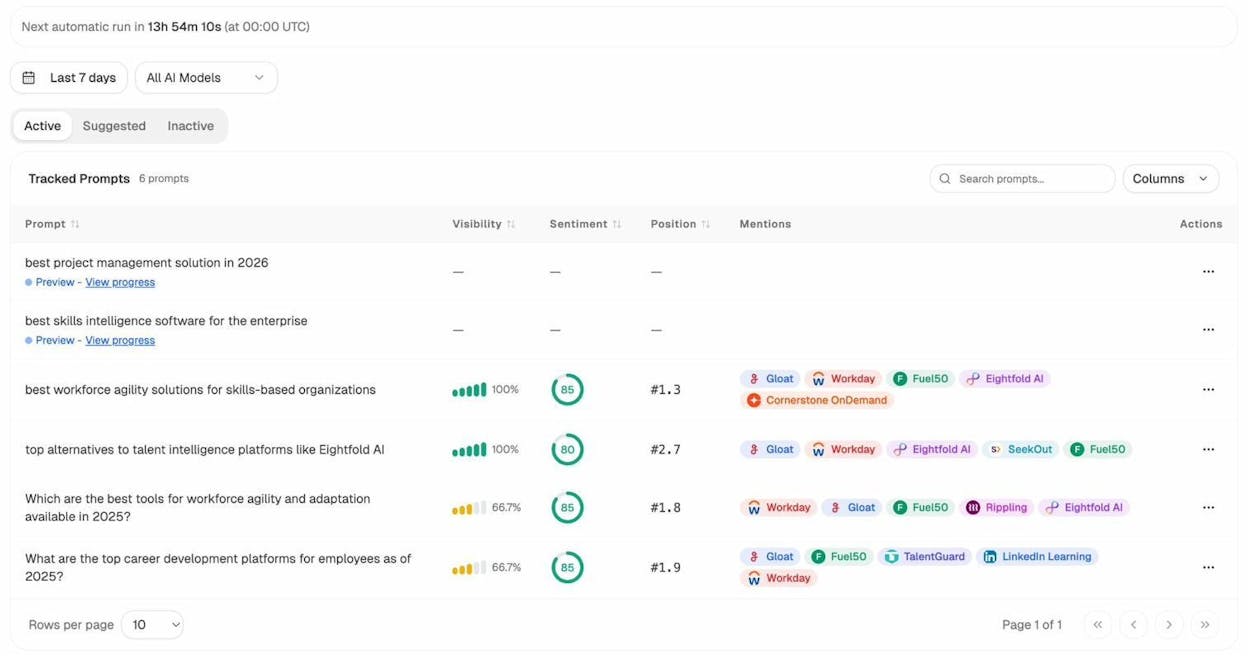
For example, if you run a project management tool, you might track prompts like “best project management software for remote teams” across all major AI engines. Analyze AI shows you whether your brand is mentioned, which competitors appear alongside you, and what position you hold in the response.
You can use the free Keyword Generator to discover which keyword types and prompt variations people are searching for, then add the most relevant ones to your tracking set.
A Quick Checklist for Website Submission
Here’s everything covered in this guide, distilled into a checklist you can work through in a single sitting.
Google Submission:
-
☐ Find your sitemap URL (or create one if it doesn’t exist)
-
☐ Sign up for Google Search Console and verify your site
-
☐ Submit your sitemap in Google Search Console
-
☐ Confirm the sitemap status shows “Success”
-
☐ Check the Pages report for any indexing issues
Bing Submission:
-
☐ Sign up for Bing Webmaster Tools
-
☐ Import your site from Google Search Console (or add it manually)
-
☐ Submit your sitemap
-
☐ Confirm Bing has started processing your pages
Indexing Troubleshooting:
-
☐ Check robots.txt for unintended crawl blocks
-
☐ Check for rogue noindex tags in your page templates
-
☐ Verify canonical tags are pointing to the correct URLs
-
☐ Audit for thin or duplicate content
-
☐ Fix any server errors or redirect issues
AI Search Readiness:
-
☐ Ensure AI crawlers aren’t blocked in robots.txt
-
☐ Generate and upload an llms.txt file
-
☐ Connect Google Analytics to Analyze AI to track AI referral traffic
-
☐ Set up prompt tracking for your most important topics
-
☐ Review which sources AI engines cite in your industry
-
☐ Monitor your AI visibility alongside your traditional SEO performance
What to Do After Your Site Is Indexed
Getting indexed is the starting line. It means Google (and AI engines) know your site exists. But it doesn’t guarantee traffic, rankings, or visibility.
To actually rank in Google’s search results, you need SEO. That means targeting the right keywords, writing content that’s genuinely useful to your audience, earning quality backlinks through an off-page strategy, and making sure your site is technically sound.
To show up in AI-generated answers, you need to think about generative engine optimization. That means creating content with clear structure, strong topical depth, and authoritative citations, since these are the signals that AI models rely on when deciding which sources to reference. You can use Analyze AI’s free SERP Checker and Keyword Difficulty Checker to evaluate the competition before targeting any keyword.
The two strategies aren’t separate. They’re layers of the same approach. Strong SEO content naturally performs well in AI search too, because both Google and AI models reward the same fundamentals: depth, originality, structure, and usefulness.
Use Analyze AI’s free Keyword Rank Checker to monitor your traditional rankings, and the AI Traffic Analytics dashboard to track your AI search performance alongside them. When you can see both channels in one place, you can make smarter decisions about where to invest your time.
The brands that win in the next era of search will be the ones that treat Google indexing and AI visibility as two parts of the same engine. Submit your website today. Then start building the kind of content that earns citations everywhere people look for answers.
Ernest
Ibrahim


