


Summarize this blog post with:
In this article, you’ll learn how to build a WordPress website from scratch, step by step. You’ll pick a domain name and hosting, install WordPress, configure your settings for search engines, choose a theme, build your pages, install the right plugins, create content that ranks on Google and AI search engines, and monitor everything so your site stays healthy. No coding experience required.
Table of Contents
Step 1. Get a domain name and hosting
Every WordPress site needs two things: a domain name (like www.yoursite.com) and a hosting provider that stores your files and serves them to visitors.
How to choose a domain name
Your domain name is your address on the internet. A few guidelines:
-
Keep it short and memorable. Two to three words is ideal. Avoid hyphens and numbers.
-
Use a .com if possible. People trust it, and it’s easier to remember. If .com is taken, .co, .io, and .net are fine alternatives.
-
Match your brand name. If your business is called “Greenleaf Design,” try greenleafdesign.com first.
-
Avoid trademarked terms. You don’t want legal trouble before your site even launches.
You can check domain availability and register your domain through a registrar like Namecheap, Google Domains, or directly through your hosting provider.
How to choose a hosting provider
Your host determines how fast your site loads, how often it goes down, and how much support you get when something breaks.
For beginners, these are the three main categories:
|
Hosting Type |
Best For |
Price Range |
Examples |
|---|---|---|---|
|
Shared hosting |
New sites with low traffic |
$3–$15/month |
SiteGround, Bluehost, Hostinger |
|
Managed WordPress hosting |
Growing sites that need speed and support |
$25–$50/month |
Kinsta, WP Engine, Flywheel |
|
VPS/Cloud hosting |
High-traffic sites needing full control |
$20–$100+/month |
DigitalOcean, Cloudways, Vultr |
For most beginners, shared hosting is the right choice. SiteGround and Hostinger both offer solid performance, free SSL certificates, and one-click WordPress installation. You can always upgrade later as your traffic grows.
![[Screenshot: SiteGround hosting plans page showing pricing tiers]](https://www.datocms-assets.com/164164/1777923292-blobid1.png?auto=format,compress&w=1248&fit=max)
One important tip: Buy your domain name and hosting from the same provider. If you buy them separately, you’ll need to update your Domain Nameservers (DNS) to point your domain to your host. It’s not hard, but it’s an extra step that trips up beginners for no good reason.
![[Screenshot: DNS nameserver settings panel showing where to update nameservers]](https://www.datocms-assets.com/164164/1777923297-blobid2.png?auto=format,compress&w=1248&fit=max)
Step 2. Install WordPress
Most hosting providers offer one-click WordPress installation. You won’t need to touch any code.
Here’s the general process across most hosts:
-
Log in to your hosting dashboard (usually called cPanel or a custom panel).
-
Find the “WordPress” or “Auto Installer” option.
-
Click “Install” and fill in basic details (site name, admin username, password).
-
Wait 30–60 seconds. Done.
![[Screenshot: One-click WordPress installer inside cPanel with the install button highlighted]](https://www.datocms-assets.com/164164/1777923298-blobid3.png?auto=format,compress&w=1248&fit=max)
Here are direct guides for the most popular hosts:
-
SiteGround: Use the Setup Wizard that appears after purchase. It walks you through WordPress installation automatically.
-
Bluehost: WordPress comes pre-installed. Just log in and start.
-
Hostinger: Use the hPanel auto-installer under “Website > Auto Installer.”
If you opted for managed hosting like Kinsta or WP Engine, WordPress is set up for you when you create your first site. No manual installation needed.
After installation, bookmark your login URL: www.yourdomain.com/wp-admin. This is where you’ll manage everything.
Step 3. Learn the WordPress dashboard
Log in at www.yourdomain.com/wp-admin using the credentials you set during installation.
![[Screenshot: WordPress login screen with username and password fields]](https://www.datocms-assets.com/164164/1777923302-blobid4.png?auto=format,compress&w=1248&fit=max)
Your dashboard is the command center for your entire website. Here’s what each section in the left sidebar does:
![[Screenshot: WordPress dashboard showing the left sidebar menu with all options visible]](https://www.datocms-assets.com/164164/1777923306-blobid5.png?auto=format,compress&w=1248&fit=max)
-
Dashboard: Your homepage. Shows a summary of recent activity, quick drafts, and update notifications.
-
Posts: Where you create and manage blog posts. Each post has a title, content area, categories, tags, and a featured image.
-
Media: A library of every image, video, and file you’ve uploaded. You can upload media here or directly inside posts and pages.
-
Pages: Where you create static pages like your homepage, about page, and contact page. Pages differ from posts because they don’t have dates or categories.
-
Comments: Manage reader comments on your blog posts. You can approve, reply, trash, or mark comments as spam.
-
Appearance: Control your site’s look. This is where you install themes, customize colors and fonts, manage menus, and edit widgets.
-
Plugins: Install, activate, and manage plugins (add-ons that extend WordPress functionality).
-
Users: Add new users (writers, editors, administrators) and manage their permissions.
-
Settings: Configure your site title, URL structure, reading preferences, and more.
Spend five minutes clicking through each section. You don’t need to change anything yet. Just get familiar with where things are.
Step 4. Configure your settings for SEO
WordPress ships with default settings that aren’t optimized for search engines. Fix these before you do anything else.
Change your site title, tagline, and favicon
Go to Settings > General.
-
Site Title: Enter your brand or website name.
-
Tagline: Write a short description of your site. Some themes display this below your title. Keep it under 60 characters.
-
Timezone: Set this to your local timezone. This affects when scheduled posts go live.
![[Screenshot: WordPress General Settings screen showing Site Title, Tagline, and Timezone fields]](https://www.datocms-assets.com/164164/1777923307-blobid6.png?auto=format,compress&w=1248&fit=max)
Next, set your favicon (the small icon that appears in browser tabs). Go to Appearance > Customize > Site Identity and upload a square image, ideally 512x512 pixels. You can create one for free with Canva.
![[Screenshot: Browser tabs showing different favicon icons next to page titles]](https://www.datocms-assets.com/164164/1777923311-blobid7.png?auto=format,compress&w=1248&fit=max)
Set your permalink structure
Go to Settings > Permalinks.
WordPress defaults to URLs with dates in them, like yoursite.com/2026/04/22/my-post/. This is bad for both SEO and readability.
Change it to “Post name” (yoursite.com/my-post/). This creates clean, keyword-friendly URLs that are easy for both humans and search engines to read.
![[Screenshot: WordPress Permalinks settings page with “Post name” option selected]](https://www.datocms-assets.com/164164/1777923312-blobid8.png?auto=format,compress&w=1248&fit=max)
This one setting has a real impact on your SEO. Search engines use URLs as a ranking signal, and shorter URLs with relevant keywords tend to perform better.
Configure your reading settings
Go to Settings > Reading.
Choose whether your homepage displays your latest blog posts or a static page. For most business websites, a static homepage is the better choice. It gives you full control over what visitors see first.
![[Screenshot: WordPress Reading Settings showing “A static page” selected with homepage dropdown]](https://www.datocms-assets.com/164164/1777923316-blobid9.png?auto=format,compress&w=1248&fit=max)
If you’re building a blog-first site (like a personal blog or news site), the default “Your latest posts” option works fine.
Also on this page: make sure “Discourage search engines from indexing this site” is unchecked. If this box is checked, Google won’t index your site.
![[Screenshot: WordPress Reading Settings with “Search engine visibility” checkbox unchecked and highlighted]](https://www.datocms-assets.com/164164/1777923317-blobid10.png?auto=format,compress&w=1248&fit=max)
Activate SSL (HTTPS)
SSL encrypts the connection between your site and your visitors. It’s what puts the padlock icon next to your URL in the browser.
Google uses HTTPS as a ranking factor, and most browsers now warn visitors when a site isn’t secure. This isn’t optional.
Most hosting providers include a free SSL certificate and activate it automatically. If yours didn’t, check your host’s SSL settings or search “[your host name] activate SSL” for a step-by-step guide.
After SSL is active, go to Settings > General and make sure both your “WordPress Address” and “Site Address” start with https:// instead of http://.
Delete unused themes
Go to Appearance > Themes.
WordPress comes with two or three default themes pre-installed. After you choose your theme in the next step, delete every theme you’re not using.
![[Screenshot: WordPress Themes page with the Delete button visible on an unused theme]](https://www.datocms-assets.com/164164/1777923321-blobid11.png?auto=format,compress&w=1248&fit=max)
Unused themes are a security risk. They sit on your server, don’t get updated, and create potential entry points for hackers. Delete them.
Step 5. Choose and customize your theme
Your theme controls your site’s layout, design, and overall appearance. It’s the foundation everything else sits on.
How to choose a theme
Go to Appearance > Themes > Add New to browse thousands of free themes directly inside WordPress.
![[Screenshot: WordPress theme browser showing the “Add New” page with featured themes and search bar]](https://www.datocms-assets.com/164164/1777923324-blobid12.png?auto=format,compress&w=1248&fit=max)
Here’s what matters when picking a theme:
-
Speed. Lightweight themes load faster. Avoid themes with dozens of built-in features you won’t use. Extra features mean extra code, which means slower pages.
-
Mobile responsiveness. Your theme must look good on phones and tablets. Most modern themes handle this automatically, but preview on mobile before committing.
-
Compatibility with your content type. A photography portfolio needs a different layout than a SaaS blog. Pick a theme designed for your type of site.
-
Active maintenance. Check when the theme was last updated. Abandoned themes don’t get security patches.
Some popular, well-maintained free themes include Astra, GeneratePress, and Kadence. All three are lightweight, fast, and have solid free versions.
If you want more design control without coding, consider a page builder plugin like Elementor or Spectra. These let you drag and drop elements onto your pages. The tradeoff is slightly slower load times due to extra code. Use builders for static pages (homepage, landing pages) and the default WordPress block editor (Gutenberg) for blog posts.
How to customize your theme
Go to Appearance > Customize to open the visual editor.
![[Screenshot: WordPress Theme Customizer showing the left panel with color, typography, and layout options alongside a live preview]](https://www.datocms-assets.com/164164/1777923330-blobid13.png?auto=format,compress&w=1248&fit=max)
The exact options depend on your theme, but you’ll typically find:
-
Colors and typography: Set your brand colors and font choices. Stick to two fonts maximum. One for headings, one for body text.
-
Header and footer: Configure your site’s top and bottom sections, including your logo, navigation menu, and footer widgets.
-
Homepage layout: Arrange sections on your homepage if your theme supports it.
-
Sidebar and widgets: Decide if you want a sidebar on your blog and what it should contain.
Typography tip: Use a font size of 18–20px for body text. Smaller text is hard to read on screens. Pair a sans-serif font (like Inter or Open Sans) for body text with a slightly bolder font for headings.
Go through each option in the customizer methodically. Preview your changes before publishing.
Step 6. Build your essential pages
Every website needs a set of core pages. Here’s what to create first, along with practical tips for each one.
Homepage
Your homepage is the most-visited page on your site. It should answer three questions within five seconds: What is this site about? Who is it for? What should I do next?
Go to Pages > Add New and build your homepage.
![[Screenshot: WordPress page editor (Gutenberg) showing a blank new page with the title field active]](https://www.datocms-assets.com/164164/1777923332-blobid14.png?auto=format,compress&w=1248&fit=max)
Include these elements:
-
A clear headline that describes what you do or what your site offers.
-
A brief supporting statement (one to two sentences) that adds context.
-
A call-to-action (CTA) that tells visitors what to do next: read a post, sign up, shop, or contact you.
-
Social proof if you have it: testimonials, client logos, press mentions.
Avoid cluttering your homepage with everything you offer. Focus on the one or two actions that matter most.
After creating the page, go to Settings > Reading and set it as your static homepage.
About page
Your about page isn’t about you. It’s about what you can do for your visitor.
Lead with the problem you solve or the value you provide, then share your story, credentials, or team. End with a CTA that directs visitors to your most important page (product, services, or blog).
![[Screenshot: Example of a clean, well-structured about page with a heading, short bio, photo, and CTA button]](https://www.datocms-assets.com/164164/1777923334-blobid15.png?auto=format,compress&w=1248&fit=max)
Contact page
Make it easy for people to reach you. At minimum, include a contact form (use a plugin like WPForms or Contact Form 7) and your email address.
If you have a physical location, add your address and a Google Maps embed. If you’re active on social media, add links to your profiles here.
![[Screenshot: A WordPress contact page with a simple form showing name, email, and message fields]](https://www.datocms-assets.com/164164/1777923337-blobid16.png?auto=format,compress&w=1248&fit=max)
Privacy policy and terms of service
These pages are legally required in most countries if you collect any user data (even basic analytics or email signups).
WordPress can generate a starter privacy policy for you. Go to Settings > Privacy and click “Create” to generate a template. Customize it based on your site’s data practices.
![[Screenshot: WordPress Privacy Settings page with the “Create” button for generating a privacy policy]](https://www.datocms-assets.com/164164/1777923341-blobid17.png?auto=format,compress&w=1248&fit=max)
For terms of service, use a free generator like Termly or TermsFeed to create a template, then paste it into a new page.
Don’t skip these pages. They protect you legally and build trust with visitors. Google also expects legitimate websites to have them.
Blog page
If you plan to publish content (and you should), create a dedicated blog page. Go to Pages > Add New, title it “Blog,” and publish it. Then go to Settings > Reading and assign it as your “Posts page.”
This tells WordPress where to display your blog posts.
Step 7. Install must-have plugins
Plugins extend what WordPress can do. They’re one of WordPress’s biggest strengths, and also one of its biggest risks if you install too many.
Go to Plugins > Add New to search and install plugins directly. Or download a plugin .zip file from the developer’s site and upload it via Plugins > Add New > Upload Plugin.
![[Screenshot: WordPress Plugins “Add New” page showing the search bar and featured plugins]](https://www.datocms-assets.com/164164/1777923343-blobid18.png?auto=format,compress&w=1248&fit=max)
Here are the plugins I recommend for every WordPress site:
SEO plugin: Rank Math or Yoast SEO
An SEO plugin helps you optimize every post and page for search engines. It adds fields for meta titles, meta descriptions, and og tags. It also generates your sitemap and lets you configure your robots.txt file.
Rank Math and Yoast SEO are the two most popular options. Both free versions cover everything a beginner needs. Rank Math tends to offer more features in its free tier.
![[Screenshot: Rank Math SEO plugin settings inside a WordPress post editor, showing the SEO score, focus keyword, and meta description fields]](https://www.datocms-assets.com/164164/1777923347-blobid19.png?auto=format,compress&w=1248&fit=max)
Security plugin: Wordfence or Sucuri
WordPress sites are frequent targets for hackers, brute force login attempts, and malware injections. A security plugin adds a firewall, login attempt limits, and malware scanning.
Wordfence is a solid free option. It blocks malicious traffic, scans for vulnerabilities, and alerts you when a plugin needs updating.
Caching plugin: WP Super Cache or LiteSpeed Cache
Caching stores a static version of your pages so they load faster for returning visitors. This directly impacts your Core Web Vitals scores and your Google rankings.
If your host uses LiteSpeed servers (many do), install LiteSpeed Cache. Otherwise, WP Super Cache is a reliable free option.
Contact form plugin: WPForms Lite or Contact Form 7
You need a way for visitors to contact you. WPForms Lite has a drag-and-drop builder that makes form creation simple. Contact Form 7 is more lightweight but requires reading its documentation to customize forms.
Analytics: Google Analytics and Google Search Console
These aren’t WordPress plugins, but you need them. Google Analytics tracks visitor behavior (page views, traffic sources, session duration). Google Search Console shows how your site appears in Google search results (impressions, clicks, rankings).
To install tracking codes, use a plugin like “Insert Headers and Footers” (now called WPCode) or “Site Kit by Google.” Both let you paste your tracking code without editing theme files.
![[Screenshot: WPCode plugin interface showing the header code field where you paste Google Analytics tracking code]](https://www.datocms-assets.com/164164/1777923349-blobid20.jpg?auto=format,compress&w=1248&fit=max)
How many plugins is too many?
There’s no magic number, but every plugin adds code that can slow your site down. Stick to plugins you actively use. If you installed something to test it and didn’t keep it, deactivate and delete it.
A well-run WordPress site typically has 10–15 active plugins. Anything above 25 is a warning sign that you should audit what you actually need.
Step 8. Create content that ranks
Your site is live, configured, and ready. Now it’s time to do the thing that actually drives traffic: create content.
Blog content is how most WordPress sites attract visitors from search engines. Every post is a chance to rank for a keyword that your target audience is searching for.
How to find topics with keyword research
Before you write anything, figure out what people are searching for. This is called keyword research, and it’s the foundation of any content strategy.
Here’s a simple process:
1. Start with seed keywords. Think of broad terms related to your niche. If you run a fitness blog, your seed keywords might be “workout,” “nutrition,” “weight loss,” and “strength training.”
2. Expand your seeds with a keyword tool. Plug your seed keywords into a keyword research tool to find specific topics with search demand. Analyze AI’s free Keyword Generator shows you keyword ideas along with search volume estimates.
![[Screenshot: Analyze AI’s Keyword Generator tool showing keyword ideas for a seed term with search volumes and keyword difficulty scores]](https://www.datocms-assets.com/164164/1777923353-blobid21.png?auto=format,compress&w=1248&fit=max)
3. Check keyword difficulty. Not every keyword is worth targeting. Some are dominated by high-authority sites you can’t outrank yet. Use the Analyze AI Keyword Difficulty Checker to see how competitive a keyword is before committing to it.
![[Screenshot: Analyze AI’s Keyword Difficulty Checker showing difficulty score and SERP overview for a keyword]](https://www.datocms-assets.com/164164/1777923355-blobid22.png?auto=format,compress&w=1248&fit=max)
4. Check search intent. Google your keyword and look at the top results. Are they how-to guides, listicles, product pages, or landing pages? Your content should match the format that’s already ranking. If the top results are all step-by-step tutorials, don’t write an opinion piece.
![[Screenshot: Google search results page showing the top 5 results for a keyword, demonstrating search intent]](https://www.datocms-assets.com/164164/1777923359-blobid23.png?auto=format,compress&w=1248&fit=max)
5. Check the SERP landscape. Use the Analyze AI SERP Checker to see who’s ranking, their domain authority, and what kind of content dominates the first page.
![[Screenshot: Analyze AI SERP Checker showing top ranking pages with authority metrics and content types]](https://www.datocms-assets.com/164164/1777923362-blobid24.png?auto=format,compress&w=1248&fit=max)
6. Build a keyword list. Aim for 10–20 keywords to start. Mix in some easier, long-tail keywords (like “best yoga mat for bad knees”) with broader terms you want to rank for over time.
For more on this, read our full guide on how to find new keywords.
How to write a blog post that ranks
Once you have a keyword, here’s how to turn it into a post that ranks:
1. Study the top results. Open the top 5 results for your keyword. Note their structure, word count, headings, and what information they cover. Your goal is to cover the same ground but do it better, with more depth, better examples, or clearer explanations.
2. Create an outline. Before writing, map out your headings and subheadings. A strong outline ensures your post has logical flow and doesn’t miss important subtopics.
3. Write the draft. Lead every section with the key takeaway, then add supporting details. Use short paragraphs (three lines max on screen). Use simple language. Avoid jargon unless your audience expects it.
4. Optimize on-page SEO elements. Using your SEO plugin (Rank Math or Yoast), fill in:
-
Title tag: Include your primary keyword near the beginning. Keep it under 60 characters.
-
Meta description: Summarize the post in 155 characters. Include your keyword naturally.
-
URL slug: Use your keyword. Keep it short. Remove filler words like “a,” “the,” and “to.”
-
Headings (H2, H3): Use headings to break up your content. Include related keywords where they fit naturally.
-
Image alt text: Describe each image. This helps search engines understand your images and improves accessibility.
-
Internal links: Link to other relevant pages and posts on your site. This helps search engines discover your content and keeps visitors browsing longer. For more on this, see our guide on internal linking for SEO.
5. Add images and visuals. Posts with images perform better than text-only posts. Use screenshots, charts, infographics, or original photos. Compress your images before uploading (use a tool like TinyPNG or ShortPixel) to keep page load times fast.
6. Publish and index. After publishing, submit the URL to Google Search Console to request indexing. Google will find it on its own eventually, but manual submission speeds things up.
For a deeper walkthrough, read our guide on how to write an article.
How to create content that shows up in AI search engines too
Here’s something most WordPress guides don’t cover: Google is no longer the only search engine that matters.
Millions of people now search using AI tools like ChatGPT, Perplexity, Gemini, and Copilot. These AI engines pull information from web content and present it as direct answers, often citing the sources they reference. If your content isn’t structured for AI search, you’re missing an entire channel of organic traffic.
This doesn’t mean you need a different strategy. The same content that ranks well on Google tends to perform well in AI search. But there are a few additional practices that help:
Write clear, direct answers. AI search engines extract concise answers from your content. If someone asks “how to install WordPress,” and your post buries the answer under three paragraphs of preamble, AI models are less likely to cite you. Lead with the answer, then add depth.
Use structured headings. AI models parse your content by its heading hierarchy. Clear H2 and H3 tags that match the questions people ask make your content easier for AI to parse and cite.
Include entities and specifics. Name specific tools, brands, people, and data points. AI models favor content that’s precise over content that’s vague. “Use a caching plugin like LiteSpeed Cache” is more citable than “use a caching plugin.”
Build topical authority. AI search engines tend to cite sources that cover a topic comprehensively. A site with 20 in-depth posts about WordPress is more likely to be cited than a site with one generic overview. This is no different from what builds authority on Google, but it matters even more in AI search because there are fewer “slots” in an AI answer than on a Google results page.
Monitor your AI search visibility. You can’t improve what you can’t measure. Use Analyze AI to track which AI engines mention your site, which prompts trigger your content, and how your visibility compares to competitors.
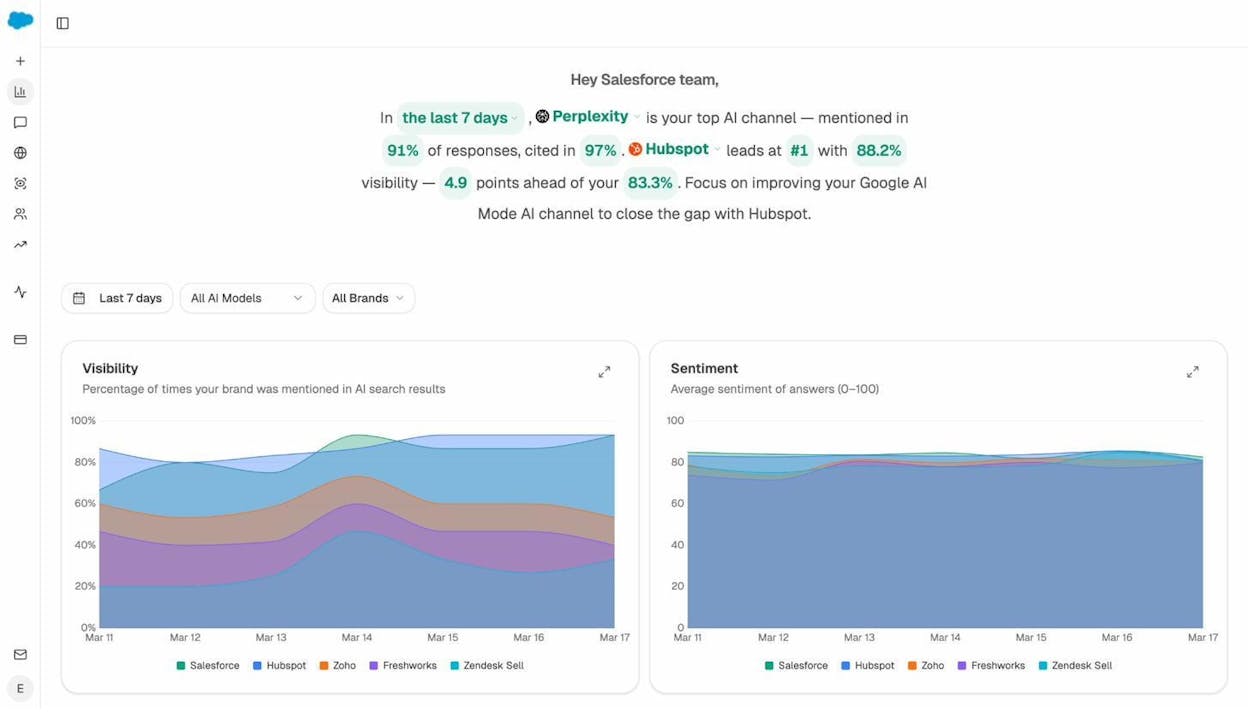
The overview dashboard in Analyze AI shows your brand’s visibility percentage across AI search engines, your average sentiment score, and how you stack up against competitors over time.
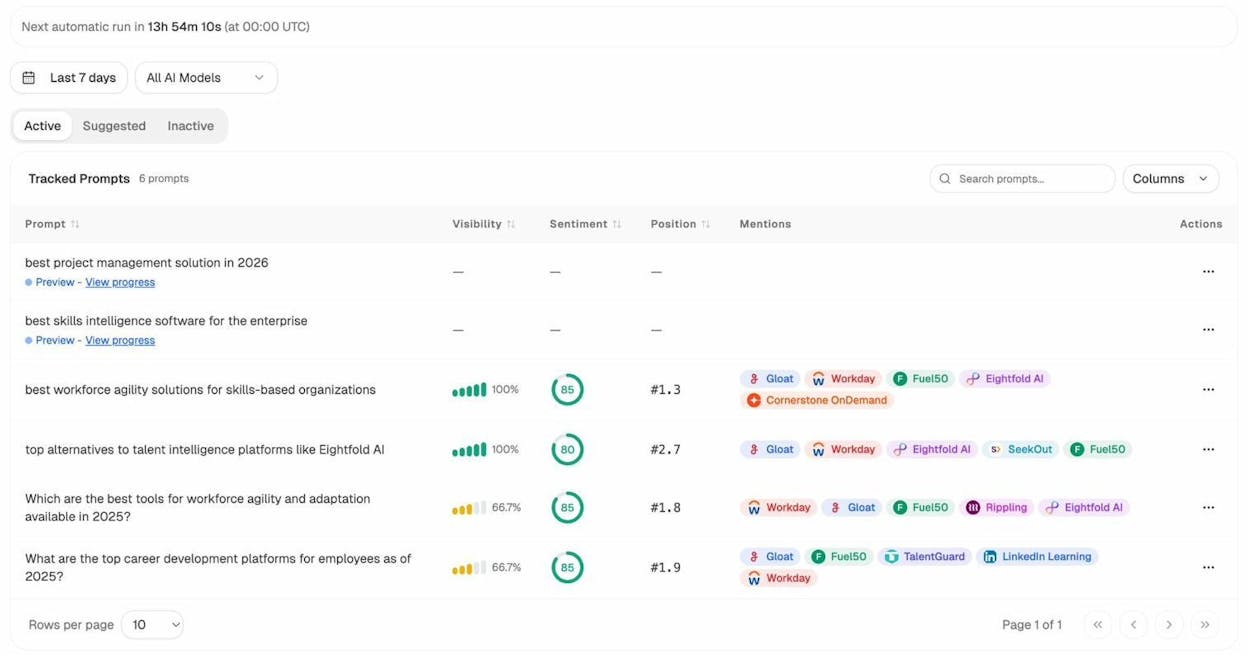
The Prompts dashboard tracks specific queries that matter to your niche. You can see your visibility, position, and which competitors show up for each prompt. This tells you exactly where you’re winning and where you have gaps to fill.
For a deeper dive into AI search optimization, read our guide on answer engine optimization.
Step 9. Optimize existing content
Creating new content is important. But some of your biggest traffic gains will come from improving content you’ve already published.
Over time, posts lose rankings. Search intent shifts. Competitors publish better content. AI search engines change which sources they cite. Content optimization is how you fight back.
How to find pages that need updating
In Google Search Console: Go to the “Performance” report and filter by pages. Look for pages where impressions are high but clicks are low. These pages are ranking on page one or two but aren’t compelling enough to earn clicks. Improving their title tags and meta descriptions can change that.
In your analytics: Look for pages with declining traffic over the past 3–6 months. These are candidates for a content refresh.
How to use Analyze AI’s Content Optimizer
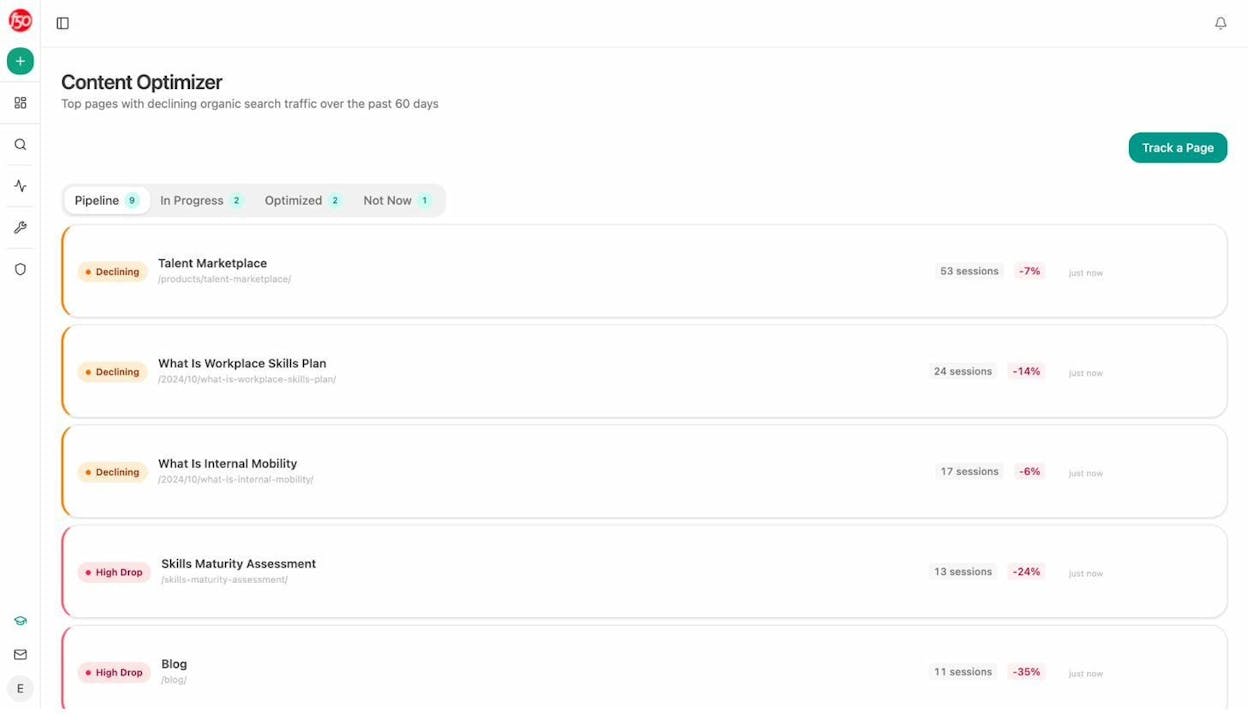
If you want to go beyond manual checks, Analyze AI’s Content Optimizer automatically surfaces your pages with declining organic traffic over the past 60 days.
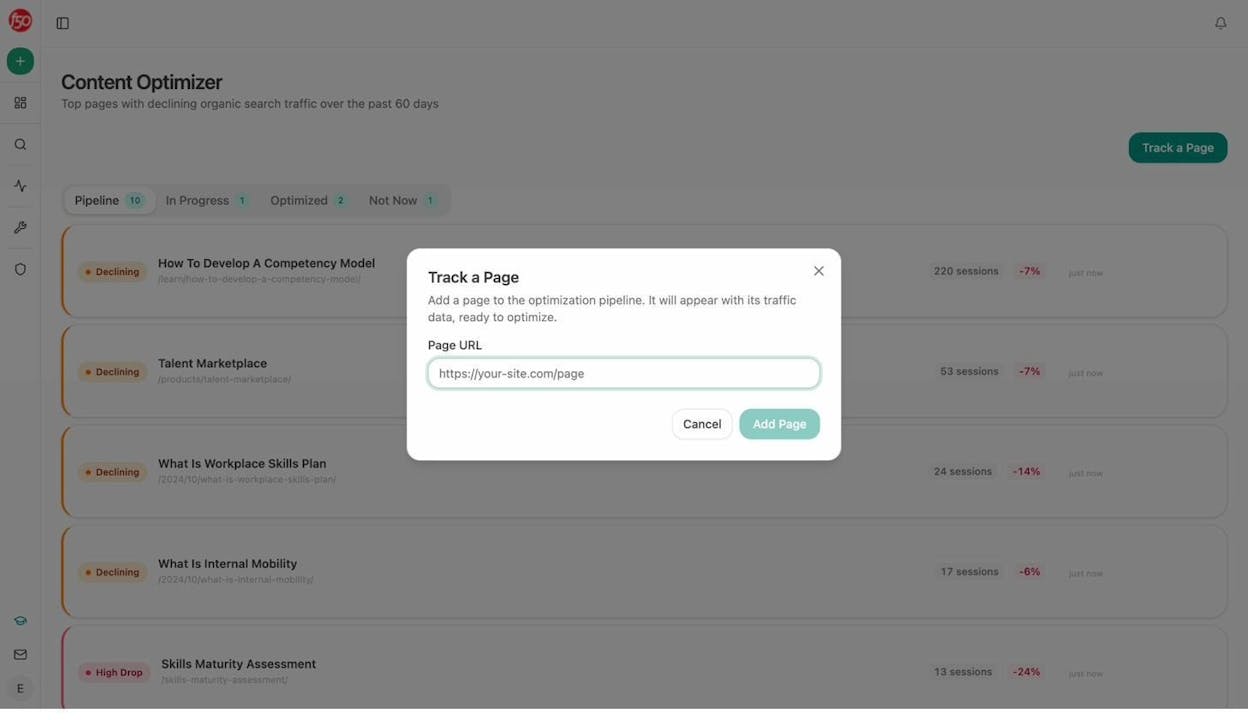
Paste any URL into the optimizer. Analyze AI fetches the page, scores it on argument strength, flow, and clarity, and generates specific editorial comments on what to improve.
The tool doesn’t just tell you “add more words.” It tells you what specific arguments, entities, or evidence your content is missing compared to what AI engines and search engines expect. The editorial comments appear inline, right next to the relevant section of your content.
This workflow closes the loop between creating content and keeping it competitive. Pages that ranked a year ago may not match current search intent or AI citation patterns today. Regular optimization keeps them performing.
How to plan new content with AI visibility gaps in mind
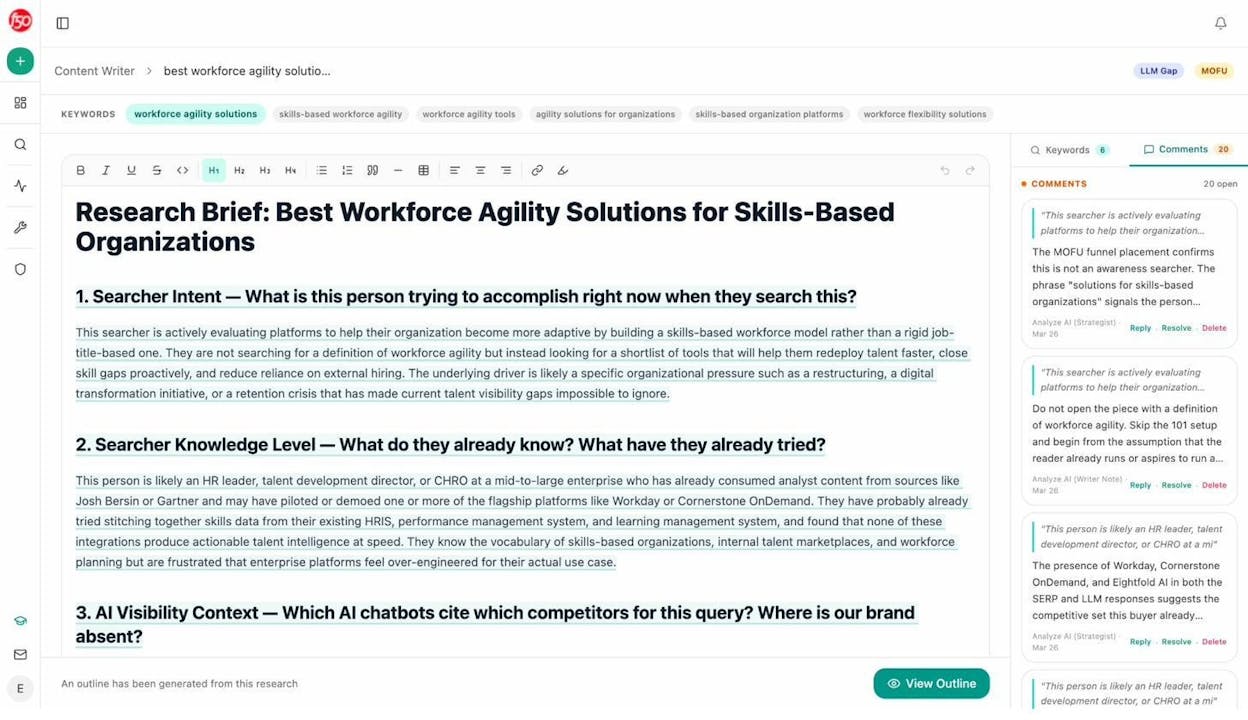
Beyond optimizing existing pages, Analyze AI’s Content Writer helps you plan new content from scratch. You can enter a keyword, a title, or even a competitor’s URL, and the tool generates a research brief, outline, and draft.
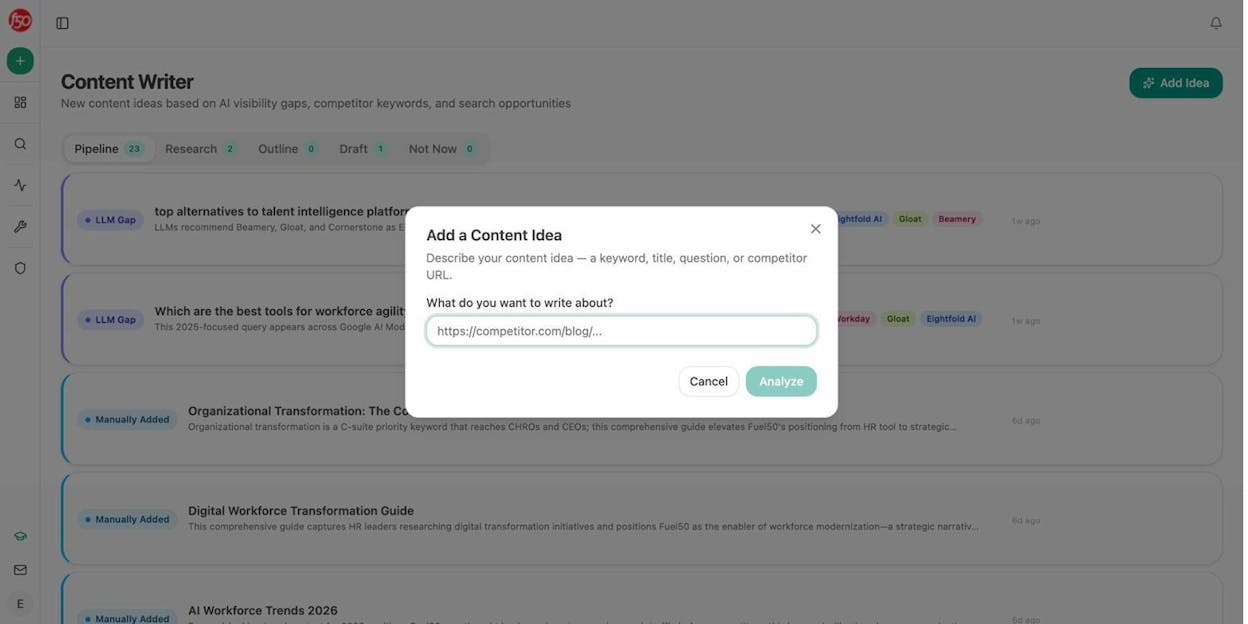
What makes this different from a generic AI writer is the research layer. The tool analyzes which AI engines cite competitors for related prompts, identifies gaps where your brand is absent, and builds those gaps into the outline so your content targets both Google rankings and AI citations from the start.
For more on building a content strategy that covers both channels, read our SEO content strategy guide.
Step 10. Monitor your site’s health and performance
Building a website is not a one-time project. WordPress sites need regular maintenance to stay fast, secure, and visible.
Keep WordPress, themes, and plugins updated
WordPress notifies you of available updates in Dashboard > Updates. Check this at least once a week.
![[Screenshot: WordPress Updates page showing available updates for plugins, themes, and WordPress core]](https://www.datocms-assets.com/164164/1777923385-blobid32.png?auto=format,compress&w=1248&fit=max)
Outdated plugins are the number one way WordPress sites get hacked. When you see an update, install it. If a plugin hasn’t been updated by its developer in over a year, find an alternative.
Before updating: If you’re running a business site, consider backing up your site first. Plugins like UpdraftPlus create automatic backups. A bad update can break things, and a backup lets you roll back in minutes.
Run regular technical audits
Even a well-maintained site develops technical issues over time. Broken links, missing meta descriptions, slow-loading images, and crawl errors accumulate quietly and drag down your SEO performance.
Use the Analyze AI Broken Link Checker to scan your site for dead links. Broken links hurt user experience and waste your crawl budget.
![[Screenshot: Analyze AI Broken Link Checker results showing broken URLs, their status codes, and the pages linking to them]](https://www.datocms-assets.com/164164/1777923389-blobid33.png?auto=format,compress&w=1248&fit=max)
For a broader audit, run your site through Google Search Console’s Coverage report to catch indexing issues, and use a tool like Google PageSpeed Insights to check your loading speed.
Monitor your AI search traffic
If you’re creating content that follows the practices in Step 8, you’ll start seeing traffic from AI search engines. The question is: how much, and from where?
Google Analytics can show you referral traffic from domains like chatgpt.com, perplexity.ai, and gemini.google.com. But parsing this manually across multiple engines is tedious.
Analyze AI’s AI Traffic Analytics consolidates all AI-referred traffic into one dashboard. You can see total visitors from AI engines, which engines send the most traffic, engagement metrics, bounce rates, and which landing pages receive the most AI visits.
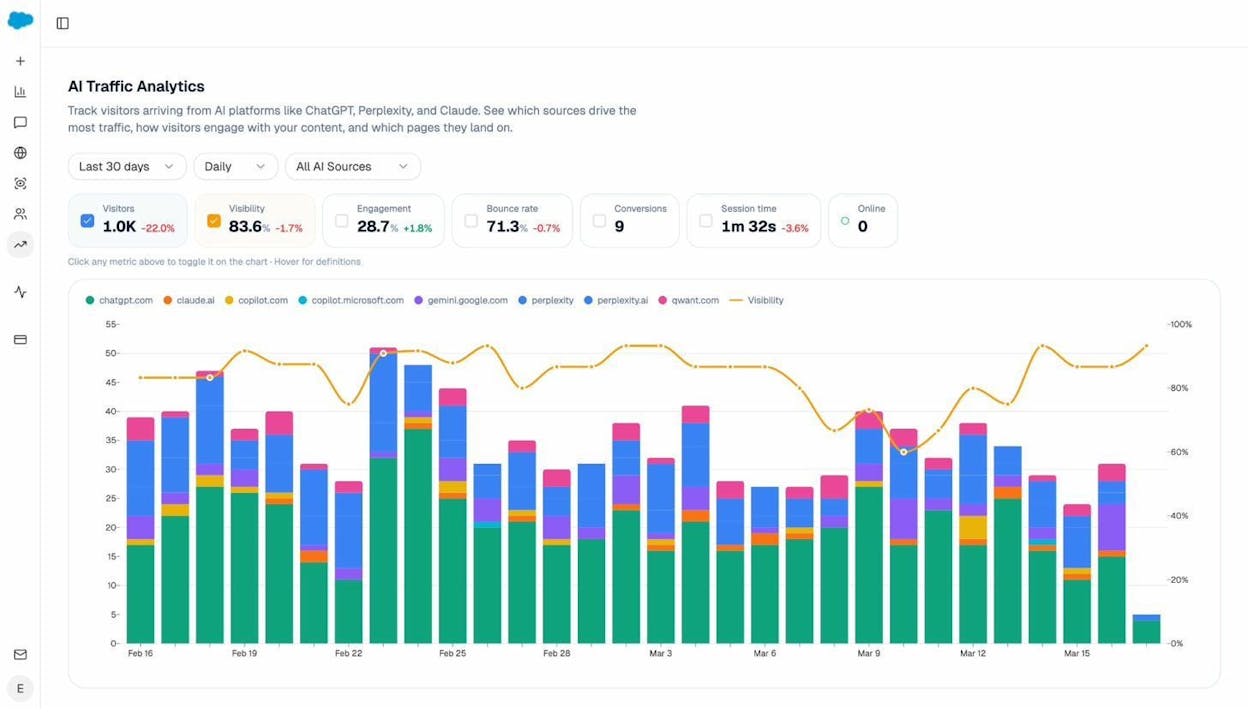
The Landing Pages view is especially useful. It shows exactly which pages on your site receive AI-referred traffic and how visitors interact with them. This data tells you which content formats, topics, and page structures AI engines prefer to cite.
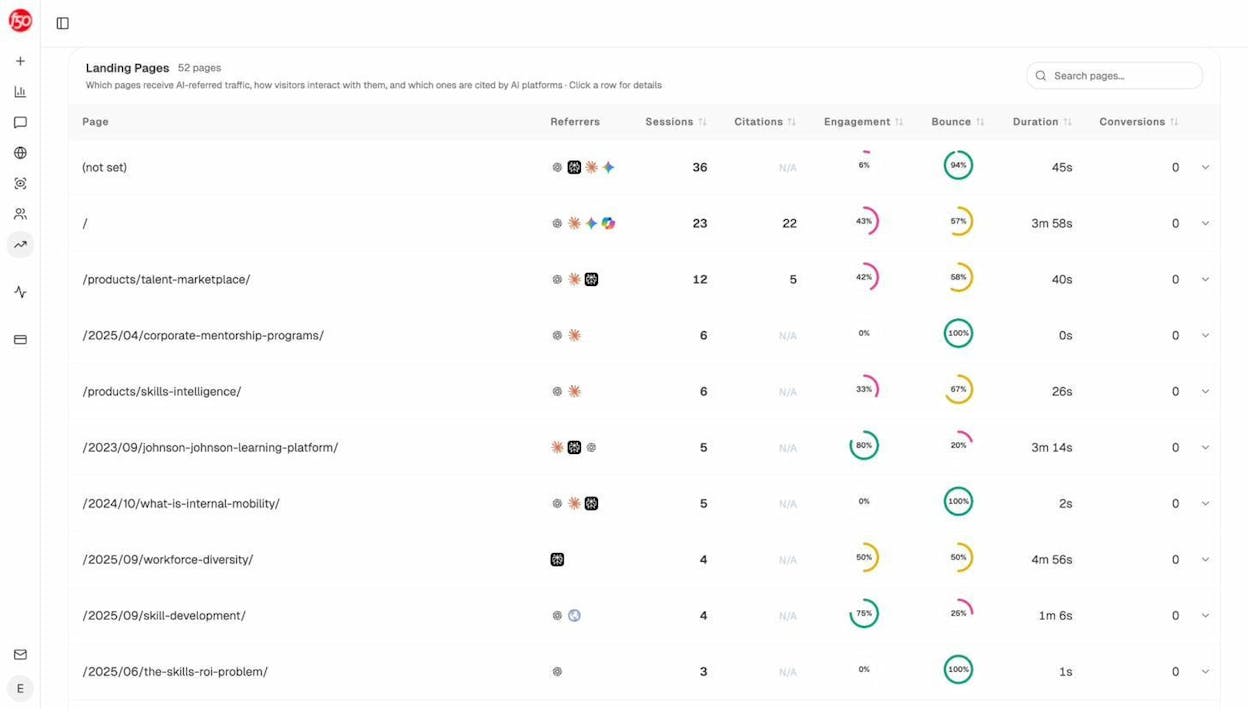
When you see a page getting consistent AI referral traffic, double down. Create more content in that format, on related topics. When you see a page with high citations but low engagement, investigate. The page might rank in AI answers but fail to convert visitors once they arrive.
Track which sources AI engines trust in your space
Beyond your own traffic, it’s valuable to know which websites AI engines cite most often in your industry. The Sources dashboard in Analyze AI shows every URL and domain that AI platforms cite when answering questions about your topic.
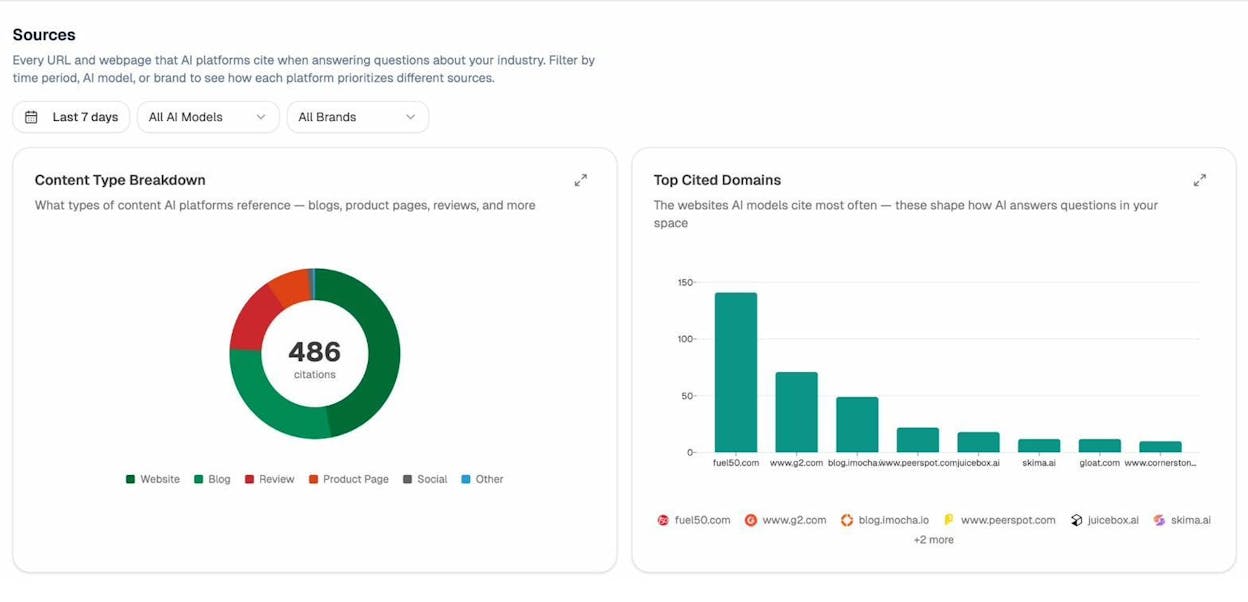
This data tells you two things. First, what content types AI engines prefer in your space (blogs, product pages, reviews, documentation). Second, which domains carry the most citation weight. If review sites like G2 or Capterra dominate citations in your niche, getting listed there becomes a priority alongside your own content.
Set up weekly monitoring
You don’t need to check dashboards every day. Set up automated monitoring so you get alerts when something changes.
-
Google Search Console sends email alerts for indexing issues and security problems.
-
Wordfence (or your security plugin) sends alerts for blocked attacks and login attempts.
-
Analyze AI sends weekly email digests with your visibility changes, competitor movements, citation updates, and priority actions, so you know what shifted without logging in.
Final thoughts
WordPress has a learning curve. But once you work through these 10 steps, you’ll have a site that’s built on solid foundations: fast hosting, clean settings, a lightweight theme, essential plugins, and a content workflow that targets both Google and AI search engines.
The biggest mistake new WordPress users make is spending weeks tweaking their theme and zero time creating content. Your theme doesn’t drive traffic. Your content does.
Start with five well-researched blog posts targeting keywords you can actually rank for. Publish them. Monitor their performance. Optimize the ones that show traction. Then repeat.
Your WordPress site is a platform. What you build on it is what determines whether it succeeds.
Ernest
Ibrahim


